ART121 - Drawing I
Spring 2003 - NVCC - Giulio Porta

By Holly Zell


This is my presentation of artwork created and techniques learned from the Art121-Drawing I class.
I took the web-based version of this class since I could not attend two days a week. 
The second week I show up at a Monday session of this class (I had another class later in the day). I asked the instructor if I could attend the lecture portion of his classes and he agreed.  I learned so much more about each concept by doing this then studying on my own. I did research a lot of these topics on the net, as well.


Concepts and Techniques Learned


    Use of different mediums: I had never worked with watercolor pencils or drawn using a ball-point pen.

    Ways to create depth in a drawing:

    Characteristics of a line and their use in drawing:

 Perspective Drawing

 Linear perspective - 


Atmospheric perspective - 


Drawing Assignments


Quality of Line

These pieces are examples of using Quality of Line to represent shade and color as well as form.  This required using a monotone medium, a ball-point pen.  The work to the left was my first attempt using pencil.  The work below was outlined in pencil, then completed in pen.  I used a ruler to obtain the long straight lines.
(was apprehensive using the pen - can't erase mistakes)


Reference Points

This assignment demonstrates using reference points to draw symmetrical objects.  The cylinder's shape is created starting with a symmetrical ellipse.  I left the reference lines visible in the drawing to the left.  I used the reference points technique again in creating the work below.  This was also a study in glass and it's reflective and refractive qualities.  Notice how the background is bent as it passes behind the glasses (refraction).  I used watercolor pencils in this drawing and had planned to do a wash on the vases but, decided I liked it the way it is.


Tonal Values

This assignment, like the first one, required the use of monotone medium, again, a ball-point pen.  Uses increasing quantity/pattern of line to show shade and color. This is my workstation at my job.  I used 7 values to illustrate this scene, the lightest with one set of lines, is the paper sitting in the IN box and the computer screen.  The darkest is on the doors of the computer cabinet with 7 sets of  lines.  I used a ruler in generating the lines. (I didn't realize how much rulers are used in drawing techniques.)


Drawing from your Direct Environment

Using watercolor pencils I drew a volleyball game in progress. The figures illustrate the concept that the further an object is away, the smaller it appears. It also gave me practice drawing figures. (More practice is needed. I have trouble drawing feet.) This was also my first attempt at wash (child-like). The floor lines do not adhere to the perspective of the scene. I lacked confidence when I did them..


Guidelines to Perspective Drawing - Self Portrait

This assignment made me realize how many art techniques in drawing are based in mathematics. Perspective drawing creates the illusion of three-dimensional environment on a two-dimensional surface. This drawing illustrates the concept that the size of an object is proportional to its distance from the eye (i.e. an object will appear half the height at twice the distance from the eye).  This project also included doing a self portrait from a profile.  I worked from a profile photograph taken of myself.


One, Two and Three Point Perspective

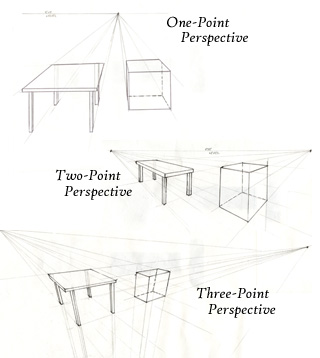
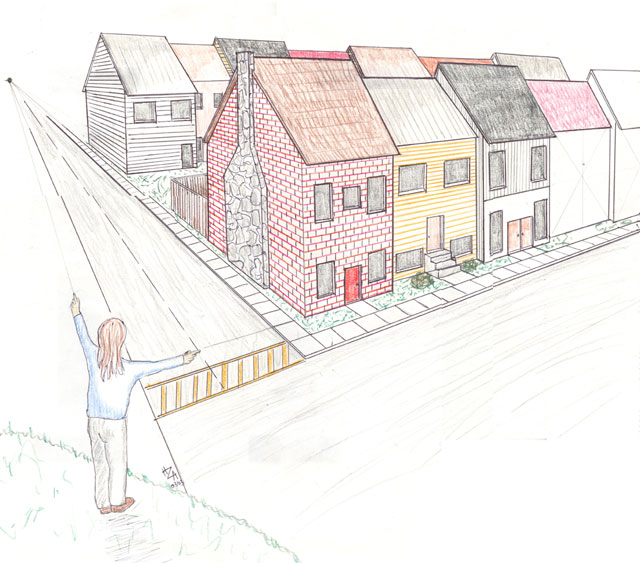
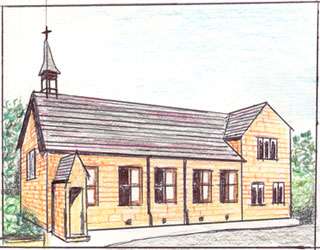
The number of points in a perspective drawing relates to how the three axes, representing width, height and depth, are seen.  In one-point perspective (top left drawing)  there is a single vanishing point representing the depth.  The width and height are seen as horizontal and vertical lines, respectively, parallel to the picture plan. 

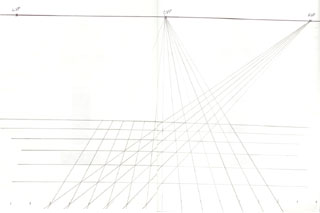
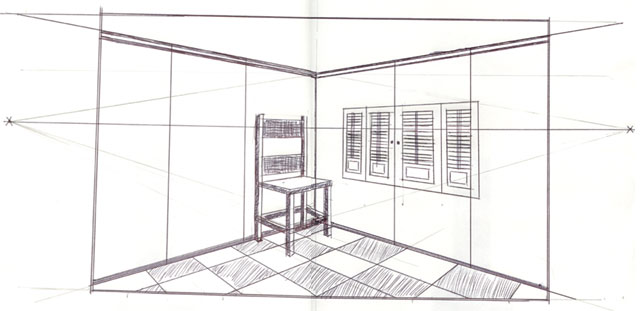
For two-point perspective (middle right drawing) there are two vanishing points used to give the representation of depth.  The vertical (height) dimension is the only one viewed parallel to the picture plane (straight on).  The width and depth are represented using oblique (angled)  lines vanishing to one of the two points.

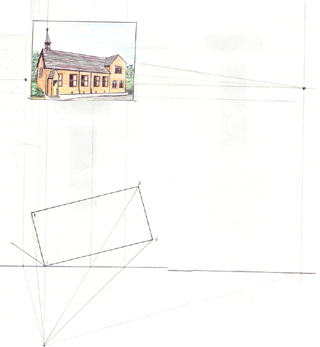
Three-point perspective (bottom left drawing) has none of the dimension view straight on and has three vanishing points, one for each dimension. In three-point perspective, the horizon is either very high looking down or very low looking up.  The third point is actually off the bottom of the page.


Two-Point Perspective

Using an objects horizontal angle to determine where the vanishing points are. A figure has been added on a high vantage point with arms held out parallel to the 2 sides of the object creating a 90º angle. The sidewalks illustrate the concept of foreshortening.


Modular Perspective Grids

When looking for more accurate representation of objects in perspective, one might find it useful to use a perspective grid. The drawing a right illustrates how to create a perspective grid with 3 vanishing points. The top horizontal line represents the horizon with the three points, left, center and right vanishing points. The center vertical point is where horizontal and vertical lines are perpendicular. On the drawing bottom line, working from the center vertical line, measure out and mark equal distances in both directions. Next draw a line from the marks to the right vanishing point. Where each of these lines cross the center vertical line indicates the correct foreshortened location for each horizontal line. From the CVP, draw lines to the marks to create the actual grid.


Landscape

This was my most enjoyable assignment to date. 

In it we used acrylic paint and brush, using only white and black, to illustrate a one-point perspective landscape of a path in the woods including a figure. I used kraft mailing paper to paint on. In my first attempt (right) I felt the large trees did not stand out enough. My instructor pointed out the splayed legs of the figure. In my second work (below) the large trees stand out more (use a stronger, heavier quality of line) and my figure is in a more realistic stance but, I thought I added too much detail to the background. It looked too busy. After critiquing with my instructor, we determined there was too much white otherwise, he liked this one better. 
(I had difficulty getting enough paint on my brush.)


Light and Shadow - Daylight

  This was a study of daylight and shadow. Using black and white acrylic paint we were to illustrate using one-point perspective, a five sided room containing a large window and a figure. We needed to demonstrate the light and shadow patterns created on the walls and the figure from the window light source. All shadows mimic an objects shape with some distortion. The size of a shadow is determined by the location of the light source. Shadows always generate from the side of the object away from the light source. Notice the wall containing the window has the darkest shadow and the shadow on the other surfaces gets lighter as it gets further from the light source. There is also strong light and shadow on the figure.
 (Via this lesson I discovered my problem with not enough paint on the brush was really a problem of not enough water. Use a lot of water!)


The Location of the Horizon

The location of the horizon in a picture determines the psychological impact it has on the viewer. It places the viewer's location. 

I used the photo at right as my model for this assignment. I was attracted by the colors. In it, the viewer's location is above, off the ground, looking down; the horizon is high. It is one-point perspective. This work also demonstrates Atmospheric Perspective. Via critique, we agreed the ground needed to be darker.
(This is only the second time I have attempted a wash. I've gotten more comfortable using the brush and enjoy using the watercolor pencils.)


Rehoboth Beach boardwalk looking south from Trasher's Fries
Source: http://rehobothboardwalk.com/


Drawing from a Floor plan

This assignment demonstrates how to take a floor plan (the view of an object from above) and generate a perspective drawing of that object. I started with the photo below left showing a rectangular church with two vertical sides visible. The bottom horizontal line in the drawing is the picture plane. The viewer's location is the lowest point on the page. To generate the rendered church, we transferred points created from the top view on the picture plane to the horizon of the perspective view. Vanishing points are determined by the objects angle to the viewer. Then, using 2-point perspective, we drew using the photo for reference.

Through this assignment and the classroom instruction, I finally understood how the 2 vanishing points were placed. 
I didn't realize that the rendered church would be so small and enjoyed detailing it. I used watercolor pencils. I washed the roof and the sides of the church then applied the brick and roof tile patterns. 


Source: http://www.geocities.com/susan2153/churches/churches.htm


Details of Church


Watercolor Wash

A wash is a mixture of water and a water-based pigment. The saturation of color is controlled by the amount of water used. 
I feel very confident using the watercolor pencils to create the wash. I was inspired by the previous project to do this church below. It's source was the online photo at right.
As with the Horizon piece, I didn't make it dark enough.


Orthographic Drawing

An Orthographic drawing has two of the three lines perpendicular at a 90 degree angle. Height and Width are view straight on. There is no depth seen by the viewer. Orthographic drawing is used in architectural drawings.
A true orthographic drawing has all view drawn using the same scale.
My '94 Vette was my inspiration.


Light and Shadow - Artificial Light

Shadows created by artificial light varies from those created by daylight because light spreads in all directions from the source (the bulb). An objects shadow extend from the center base vertical of the light source falling on the far side of the object. The length of a shadow is determined by its distance from the light source measured from the center of the light. Other shadow characteristics are shape and transparency. The shape distorts and the shadow value weakens/fades as it extents away from the light source.
I quickly sketched this setup, then produced it reduced in size using watercolor pencils and using a wash to complete.


The Human Figure

One of the most popular subject matters in art. To draw the human figure, you must understand anatomy. My background in group fitness training required me to learn Kinesiology. Kinesiologists use these three primary sciences, biomechanics, exercise physiology, and psychomotor behavior to study human movement. I had to know skeletal structure and musculature. In the works below, the focus was on how clothing hangs on the body. I sketched classroom models then produce the acrylic work at the bottom. For the most part I felt I got the human proportions correct.


As the semester has gone on, I have become more confident as an artist. I have learned so many new techniques, mediums, and styles. 
I need to take more risks with my art. 
Completing the work for this class was very difficult for me. I'm a bit of a perfectionist and I take too long to create my work.
This is the reason I switched education majors to IST 20 years ago.
I long to be a graphic artist doing ads using all of my technical and creative talents...


©Holly A Zell
Revised: September 20, 2007
All Original Artwork Copyrighted.