|
|
| HOME | GRAVEYARD | CAULDRON | FUNERAL PARLOR | MAUSOLEUM | DUNGEON | PROPS | PARTIES |
| AWARDS | GUEST BOOK | LINKS | WEB RINGS | GAMES |

Added 2006 - WILL
NOT RETURN
![]()
I came across the idea for a Pumpkin Totem Pole years ago, but never tried it because I would have had to use real pumpkins. I had always found carving real pumpkins to be stressful. I always waited until the last minute to crave the pumpkins, so they would look their best for Halloween and last a few days after, at least until my party. Sometimes I would even be carving a pumpkin while waiting for trick-or-treaters. That stress ended in 2004.
Two years ago I found Styrofoam pumpkins at a craft store (Michael's). What a Godsend! I bought several in different sizes and craved my favorite patterns on some. Of course, I had to buy battery-operated lights ($5 each) to place inside, instead of a candle. After last year I again purchased a few to crave during the off-season (they were half price-$10) . They have been ratting-around on my porch since their purchase.
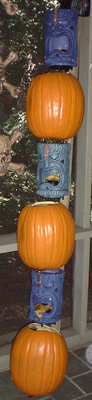
I saw the tiki at CVS, a local drug store, about a week ago and had to have it. The side of the box showed three stacked, so I bought three. They were on sale and I got them for $10 each. I planned to use them for the 4th of July and figure out how I could incorporate them in Hollyween later. I had them stacked in the living room to play with and show off.
While cleaning-up my porch in anticipation of July 4th, I brought the three neglected pumpkins inside and wiped them clean. As I walked into the living room with one in my hand and saw the tiki, it hit me. The pumpkin totem pole idea popped back into my head. The next thing you know I was stacking tikis and pumpkins.
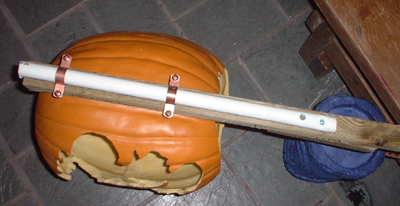
To secure the pieces together, I plan to use one 6ft 2x2 piece of wood and attach each tiki and pumpkin to it. I will also attach a long piece of 1/2 inch PVC pipe to the back for securing the pole to the ground. Using 2' rebar pounded in halfway, I'll slide the PVC pipe over it. This will hold it upright and secure. All the items are fairly lightweight. Of course, I will carve the pumpkins with complimentary, tiki-like faces. I plan to add legs, arms, wings, beaks, etc like a real totem pole might have to make each of the six sections unique.
July 1, 2006 - Bought supplies and started building Totem.
Bought treated wooden 2x2 10ft pole to mount pumpkins/tikis on. Roughly laid out the design and sawed off unused portion of pole.
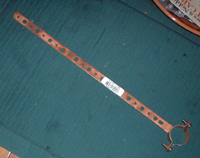
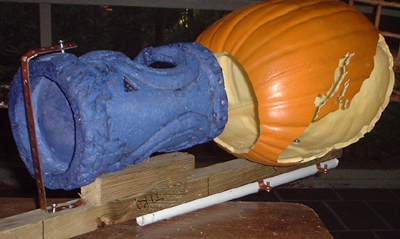
Decided to further cut up unused piece to use for mounting tikis, they are not as wide as the pumpkins and if I mounted them flat, the totem wouldn't have the right look. Also went to Home Depot to get support pieces for pumpkins. Found the perfect thing in plumbing.
Support for tiki - nail though back center of tiki and nail through bracket and forehead to hold in place.
I don't want to permanently attach the tikis as I may use them for other purposes.Used a Dremel sander to break contact between top ring and bracket. Decided to use 2 rings to attach the PVC pile to the back of the pole. This will be part of the support. Used 2" screw to permanently attach PVC at top to the pole. I will slip this over a 2ft rebar.
I also plan to put 1 1/2 ft supports out in front and on each side of the pole so it can't be tipped over.
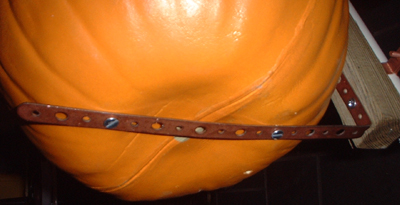
Attached the bottom Styrofoam pumpkin using the ring-less bracket. Hammered 2 small nails though back center to attach to pole. Then drilled small holes in bottom of pumpkin to attach to bracket. Used screw with nut to attach pumpkin to bracket.
Replaced back center nails with 1" screw and washer.
The pumpkin is firmly attached to the pole and doesn't wiggle around.
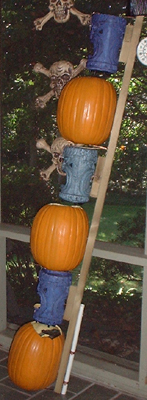
This design allows the props to be disassembled for storage.Here is how the bottom two totem look so far...
As you can see, the block extends the tiki out just the right amount so it looks liked it's centered on top of the larger, rounder pumpkin.
Design Flaw Corrected: When stood upright, the tiki fell off, the bracket is too flimsy to remain firmly in place.
Replaced top tiki nail with long screw and nut for holding tiki in place. Much more secure now but, still easily removable.8/12/06 - Completed attaching all pieces to pole
8/14/06 - Created and attached triangular base for stability.
With the rebar this prop shouldn't move.

Decided to add metal "L" brackets on sides to attach vertical pole to horizontal base for added stability.
I will detach all the pumpkins/tikis and paint the support pole/base black.
Now that I've resolved the attachment and support issues, I need to get to work carving the pumpkins.
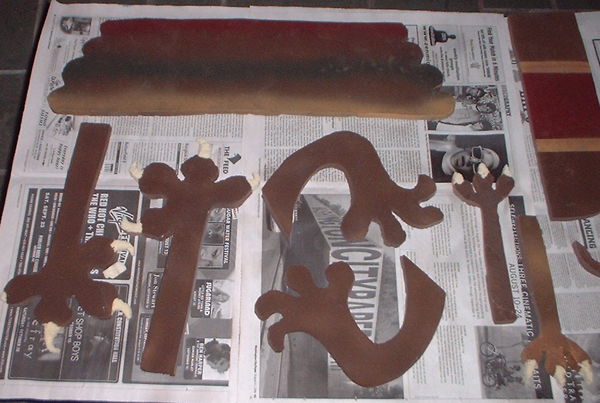
I've already sketched out some designs...Late August 2006 - Created appendages and decided all the pumpkins will have different skull-type faces.
Appendages made with blue-covered insulation foam board and painted. Peeled off covering before painting. Sealed all with lacquer.
Top tiki will have colorful wings and toucan beak. Top pumpkin will have (skull and) four crossbones.
Middle tiki and pumpkin will have arms. Plan to cover tiki with sheer curtain and glue in place to make a ghost.
Bottom tiki will have bird legs and beak. Bottom pumpkin will have large legs.
Extra 3 horns will not be used.
Will either attach to sides of pumpkins/tikis or to back support pole.
May have to remake appendages as foam board used is very light and thin and easily broken.
Used this material because couldn't seem to find pink foam board less than 3" thick anywhere.Labor day weekend: Two of the three pumpkins carved. One to go but I can't decide on a face.
Think the 3rd will have a more tiki-like face now.
Found 2 additional tikis at half price ($15 for 2) at CVS. Bought as backups.
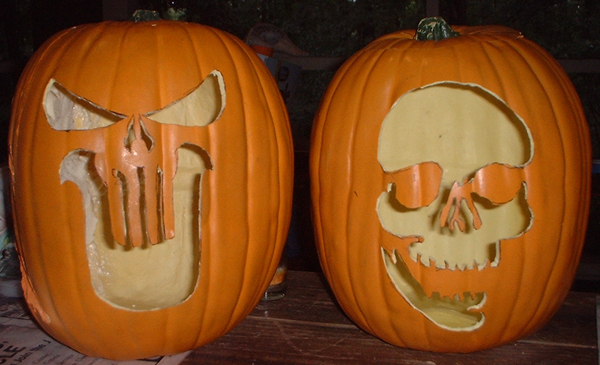
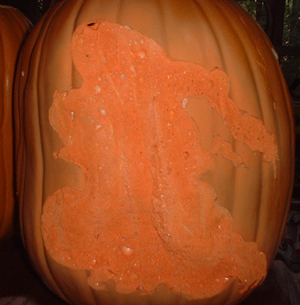
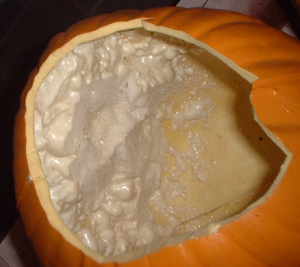
How to Repair a Styrofoam Pumpkin
Repaired a large opening in a pumpkin (on left above) using Great Stuff, an expanding foam product.
Covered hole with overlapping 1½" painter's tape first, going top to bottom.
Then sprayed the Great Stuff on top.
Allowed to cure for a week then removed tape and trimmed excess inside.
Then sprayed outside with orange paint.
![]()

|
|
|
![]()
![]()